
party – maps – guide – data
Real-time mapping will help you explore 37 dungeons and 15 surface areas in MM6. There are 12 towns, large and small, to discover and explore. We suggest you do not use online maps, instead use the built-in real-time mapping to discover your path as your journey unfolds.
Seek us out, in your time of need.
Priest of Baa
Real-Time Mapping
Real-time mapping is built into Might and Magic VI. There are no need for tools. As you walk around and explore your map is filled in. MM6 dungeons occupy 3d space and maps are sometimes hard to follow as layers display stacked on top of each other. As such, it is simpler to follow text directions.
Dungeon Solutions
Find here everything you need to know to solve all the dungeons. The order they are listed in is based on the Average Level of foes found in the dungeon. You may want to solve them in this order but most likely a different order will suit your quests, your party style, or your current location in the world.
If you want a little guidance on dungeon order, refer to the this article about using data to pick next dungeon. (full of spoilers).
The boost call-out in the following dungeon solutions is a count of barrels or cauldrons, however some will be Empty. Which color is there or if it is empty is decided when the dungeon is initially entered. Exiting and re-entering will not respawn the Boosts. If it is your first time to the dungeon you can save before entering and then reload if you don’t get the spawn you want – not really worth it, in my opinion.
Goblinwatch
The weathered stones of this old keep shelter empty buildings in an unused courtyard. Faint sounds echo from a worn stairway that leads down below the keep.

Objectives:
Find the Goblinwatch Code scroll

Foe Groups:
1  Common Rat,
   Large Rat,
   Giant Rat
2  Goblin,
   Goblin Shaman,
   Goblin King
3  Blood Sucker,
   Brain Sucker,
   Soul Sucker

Rest-time Encounters:
    Chance:	10%
then which
   Group 1:	40%
   Group 2:     30%
   Group 3:     30%

AVG Foe Lv:	5.11
AVG Foe HP:	18.11
Conditions:     DISEASED

Loot:
Containers:	10
Trap Level:	1
Boosts:         0

Walkthrough:
Speak to Janice in New Sorpigal Town Hall
Obtain the Key to Goblinwatch
Enter Goblinwatch
West passage to treasure room with 3 chests hidden behind panels
Goblinwatch Code is here in one of the chests

At this point you can leave or continue to explore and find all the containers. To explore the lower depths you will need the code for the keypad.

Code: NILBOG
Abandoned Temple
Strange squeaking echoes from behind the front doors. At one time, a Temple of Baa, a foul curse caused the old inhabitants to move away.

Objectives:
Retrieve Spider Queen Heart
Retrieve Candelabra
Retrieve Angela

Foe Groups:
1  Bat,
   Giant Bat,
   Vampire Bat
2  Cobra,
   King Cobra,
   Queen Cobra
3  Spider,
   Giant Spider,
   Huge Spider
U  Queen Spider

Rest-time Encounters:
    Chance:	10%
then which
   Group 1:	30%
   Group 2:     40%
   Group 3:     30%

AVG Foe Lv:	8.31
AVG Foe HP:	32.58
Conditions:     POISONED,
                DISEASED

Loot:
Containers:	11
Trap Level:	1
Boosts:	        3

Walkthrough:
Candelabra in 2nd Room, to E
Angela in 1st Branch Passage, to N
Dungeon with Cages, beyond Angela
Note the 2 Cages to N will kill you
Continue to next cave junction
There are rocks here and a ledge
East path, unchested dead-end
West path to another junction
South path, chested dead-end
West path, Alcove with Cobra Eggs
Continue West to Spider Queen
Teleport back to Start is here
Temple of Tsantsa
The smells of death and decay seem to fill the air near this structure. The temple's original purpose has long since been forgotten by the new worshippers.
Objectives:
Rescue Sherell
Foe Groups:
1 Cannibal,
Head Hunter,
Witch Doctor
2 Cannibal,
Head Hunter,
Witch Doctor
3 Cobra,
King Cobra,
Queen Cobra
Rest-time Encounters:
Chance: 15%
then which
Group 1: 30%
Group 2: 30%
Group 3: 40%
AVG Foe Lv: 8.56
AVG Foe HP: 33.33
Conditions: POISONED,
WEAKNESS
Loot:
Containers: 6
Trap Level: 1
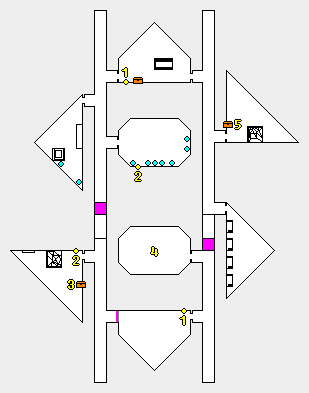
Walkthrough:
Directions denote where to go at each junction. You will need to find a Key, hit 3 levers and then clear the final chamber that is revealed. There is a lot that can be avoided and these directions avoid as much as possible.
From Entrance to 1st Lever
N.N.W.NW.NW.S
From 1st to the 2nd Lever
W.W.JUMP.N
From 2nd to the Cell Key Chest
S.S.E
From Cell Key to the 3rd Lever
W.N.NE.NW.N.E.JUMP.S
From 3rd to Main Battle
To the West then North is the large room that you want to explore. It is full of Cobra and Cannibals. If you need to, use the Pit that you Jumped over just to get here. You can pull a few Cobra out of the big room then jump over the Pit and shoot them from the far side.
Continue through a door and down to find the Cell with Sherell. Escort her back to Free Haven.

Temple of the Fist
This large but simple structure has become the center of worship for a small religious group called the Order of the Fist.

Objectives:
Destroy the Crystal

Foe Groups:
1  Common Rate,
   Large Rat,
   Giant Rat
2  Novice Monk,
   Initiate Monk,
   Master Monk

Rest-time Encounters:
    Chance:	10%
then which
   Group 1:	20%
   Group 2:     80%

AVG Foe Lv:	10.50
AVG Foe HP:	49.33
Conditions:     DISEASED

Loot:
Containers:	3
Trap Level:	1

Walkthrough:
Take the Right ramp down
Tap the Flickering Torch
Tap the revealed Button Switch
Backtrack to first room
Take the Left ramp down
Follow only path to the Crystal Room

You will face a few Master Monk, 3 of which are in the room with the Crystal.  You can try to pull them out one at a time but not guaranteed to work. You can also use the temple to heal up if you need to, its close by.

Another tactic that can work is to rush the crystal.  It's not perfect plan but there is no animation when using the crystal so it's quick use and cruise.  Definitely works better after you kill a few Monks.

Return to Winston Schezar in Bootleg Bay.
Free Haven Sewer
Objectives:
Capture Prince of Thieves

Foe Groups:
1  Common Rat,
   Large Rat,
   Giant Rat
2  Acolyte of Baa,
   Cleric of Baa,
   Priest of Baa
3  Thief,
   Burglar,
   Rogue

Rest-time Encounters:
    Chance:	10%
then which
   Group 1:	30%
   Group 2:     30%
   Group 3:     40%

AVG Foe Lv:	10.89
AVG Foe HP:	48.89
Conditions:     STOLEN ITEM,
                DISEASED

Loot:
Containers:	6
Trap Level:	2

Walkthrough:
Make sure you talk to Lord Stone first to get the quest.  You can't do this one backwards.

There are many entrances to the sewers but all of them access the same interconnected map. Any entrance will work.

The entrance from Takao's house enters right at the locked door, keeping you out of the room with all the gold. You can find the Sewer Key in one of the many wall grates.

Takao's house entrance is somewhat close to where the Prince of Thieves is hiding.  To find the Prince travel to the NW corner of the map.  Find a secret door behind a partition wall. Look under the bed.

Explore all the dead ends as there are chests and/or items lying on the ground.  There is a Healing Well in the center of the map.
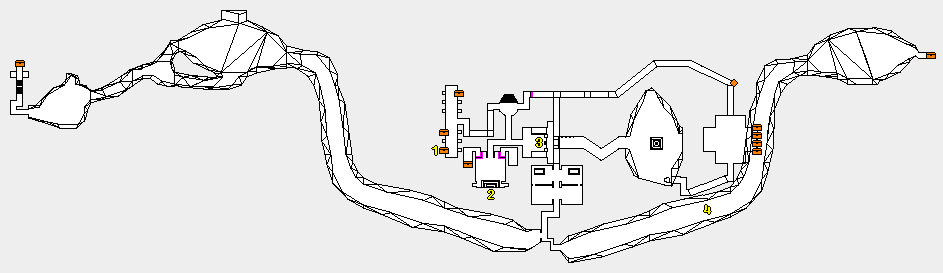
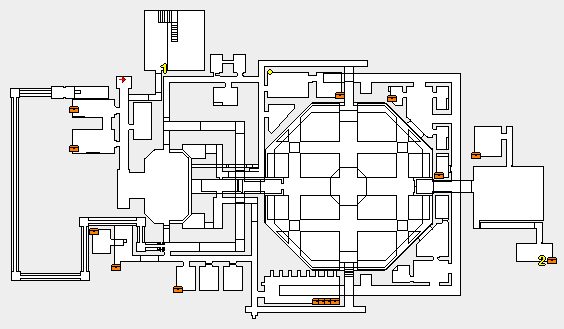
Temple of Baa
Faint chanting can be heard from beyond the doors of this Temple. Visitors do not appear to be welcomed here.
Objectives:
Retrieve Chime of Harmony
Foe Groups:
1 Acolyte of Baa,
Cleric of Baa,
Priest of Baa
2 Spider,
Giant Spider,
Huge Spider
3 Skeleton,
Skeleton Knight,
Skeleton Lord
Rest-time Encounters:
Chance: 10%
then which
Group 1: 10%
Group 2: 40%
Group 3: 50%
AVG Foe Lv: 11.22
AVG Foe HP: 49.33
Conditions: POISONED,
DISEASED,
CURSED,
AFRAID
Loot:
Containers: 6
Trap Level: 1
Boosts: 9
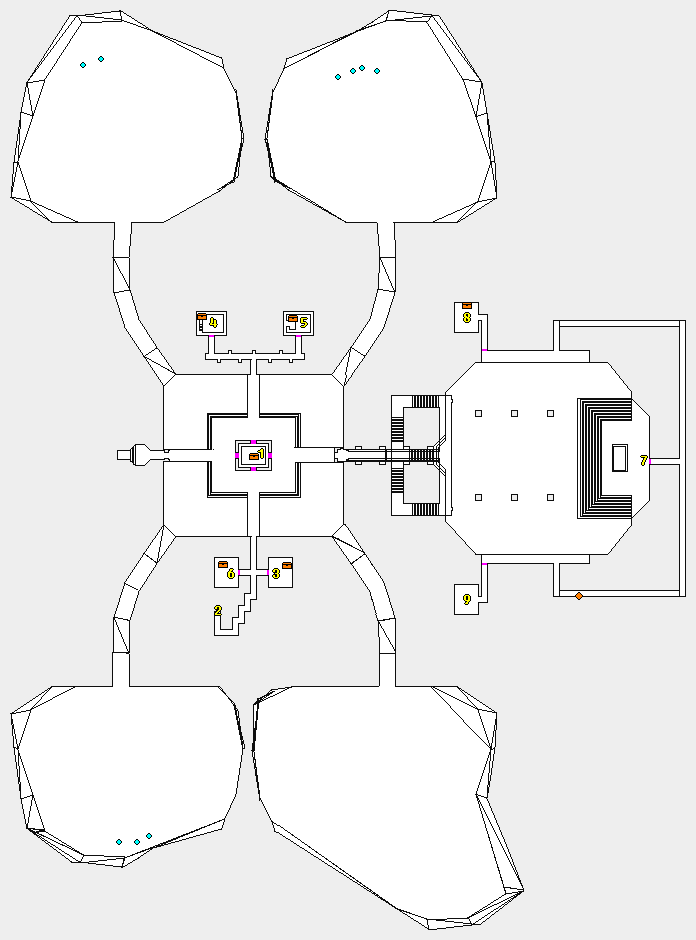
Walkthrough:
The door to E opens to a large room with 4 Outer Doors to N,E,S and you came from the W. There are also 4 large passages leading NW,NE,SE,SW. In the center of the room is a square structure with 4 doors.
Door to S on the edge of large room
Door to S at first junction
Check Statue: Store Room Key
Backtrack to junction
Door to E, uses Store Room Key
Check Chest: Bathhouse Key
Foes spawned in the large room
Clear the large room
Door to N on edge of large room
Passageway to E
Door to N, use Bathhouse Key
Check Chest: Store Room Key
Foes spawned in the large room
Clear the large room
Door to S on edge of large room
backtrack back to junction
Door to W, uses Store Room Key
Check Chest: Secret Door Key
Back to the large room
Just open the Door to E on edge and
Fireballs! but say in big room
The fireball will damage the foes
Now the center area
Touch inner door that faces N
Touch inner door that faces E
Touch inner door that faces W
Touch inner door that faces S
Now all inner doors are open
When you open the chest you will spawn a lot of skeletons and they will try to surround you unless you move quickly. Clear the room, be sure to collect the Bathhouse Key from the chest.
Door to N edge of large room
Passageway to W
Door to N, uses Bathhouse Key
Check Chest: Treasure Room Key
Clear the large room
Now done with the first large room. Door to E, watch for the Fireball. Clear your way around and up to another large room.
Clear the second large room but be wary as approaching the dias will spawn a lot of skeletons. Clear the men of cloth before triggering the skeletons. You can lure folks into the fireball path if you need extra firepower.
Secret Door to W of 2nd large room
Uses Secret Door Key
E to junction
Path to N then W
Secret Door to N at W side balcony
Uses Treasure Room Key
Check Chest: Chime of Harmony
Treasure Room Key
Back to junction
Path S then W
Secret Door to S at W side balcony
Collect the gold
Shadow Guild Hideout
This area appears to be abandoned. However, fresh footprints lead in and out from a recently repaired door. Perhaps it isn't so abandoned after all.

Objectives:
Rescue Sharry Carnegie

Foe Groups:
1  Thief,
   Burglar,
   Rogue
2  Thug,
   Ruffian,
   Brigand

Rest-time Encounters:
    Chance:	20%
then which
   Group 1:	50%
   Group 2:     50%

AVG Foe Lv:	13.67
AVG Foe HP:	61.83
Conditions:     N/A

Loot:
Containers:	3
Trap Level:	2
Boosts: 	9

Walkthrough:
W at first junction
Switch on N wall should be IN
Back to junction
N to next junction
Note the Locked Door to W
N to next junction
N to next junction
W into the mess hall
Switch on S wall can be ignored
Door to W
S to junction
S to junction
W into Storeroom
Switch on S wall should be IN
Back to junction
S to next junction
Door to W
Check Chest: Guild Key
Use the Guild Key on the Locked Door
Escort Sharry back to New Sorpigal
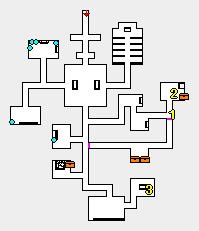
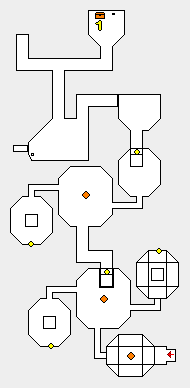
Snergle’s Caverns
These caverns once belonged to the exiled King Rocklin, but now they are home to the new Dwarven King, Snergle.

Objectives:
Defeat Snergle and retrieve his Axe

Foe Groups:
1  Dwarf,
   Dwarf Warrior,
   Dwarf Lord
2  Bat,
   Giant Bat,
   Vampire Bat
U  Snergle

Rest-time Encounters:
    Chance:	10%
then which
   Group 1:	20%
   Group 2:     80%

AVG Foe Lv:	1400
AVG Foe HP:	76.43
Conditions:     DISEASED,
		BROKEN ARMOR

Loot:
Containers:	1
Trap Level:	3
Boosts:         14

Walkthrough:
Gold Veins and Gems on the walls can be examined for potential gold but it may trigger a cave-in which grants party damage instead.

Advanced to the first large room
Search waterfall (reload for random)
W through the open passage
S to Bones, +5 Ma Resist (perm)
N to Bones, +5 Po Resist (perm)
W to liquid barrels
Backtrack to large room
N up the ramp to 3 Barrels
Up in the elevator
Clear the large room
Press the Switch in the floor
W to x Barrels

Use Snergle's Chamber Key for a big fight with a lot of dwarves.  You will be surrounded -- a viable solution is to Set a Lloyd's Beacon back near the elevator.. open Snergle's door then recall.. take out the dwarven horde with a protected flank.

Snergle's Throne switch opens a new passage.  the first Glowing Dinosaur Bones grants +5 MGT, the second one teleports you back to entrance of dungeon.
Dragoon’s Keep
The Dragoons rebuilt and refurbished this keep to serve as their headquarters. From here, they prey on traffic to and from Free Haven.

Objectives:
Find lost artifact

Foe Groups:
1  Common Rat,
   Large Rat,
   Giant Rat
2  Fighter,
   Soldier,
   Veteran

Rest-time Encounters:
    Chance:	20%
then which
   Group 1:	40%
   Group 2:     60%

AVG Foe Lv:	14,17
AVG Foe HP:	76,17
Conditions:     POISONED,
                DISEASED

Loot:
Containers:	4
Trap Level:	1
Boosts:         10

Walkthrough:
Right Door to N
Door to N
Door to S at end-of-hall
Door to W
Activate the Switch
Backtrack to the first room
Left Door to N
Long hallway
First Door to W
Clear for Barrels, ignore switch
Second Door to W
Secret Door to W for Chest
Back to long hallway
N down the stairs around to N again
Switch on E wall
Clear the rats
N cell room
Activate the Switch
Short time passes door will open
Backtrack up the stairs
Head S, first passage to E
Clear the room
Chest for the lost Artifact
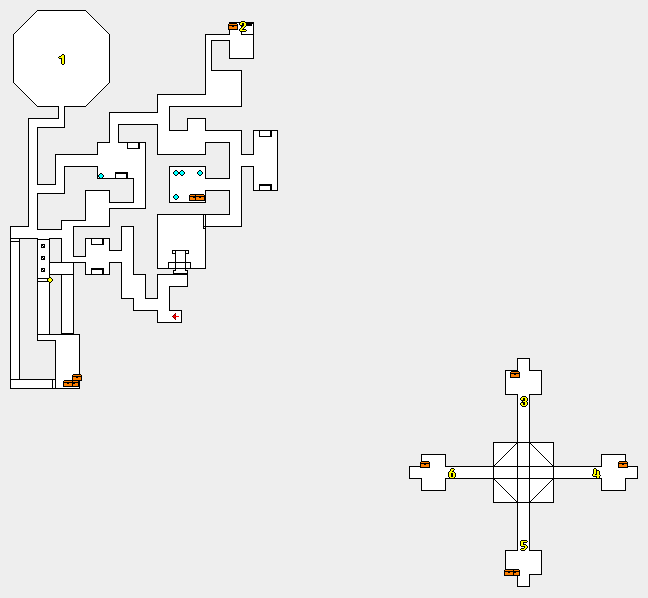
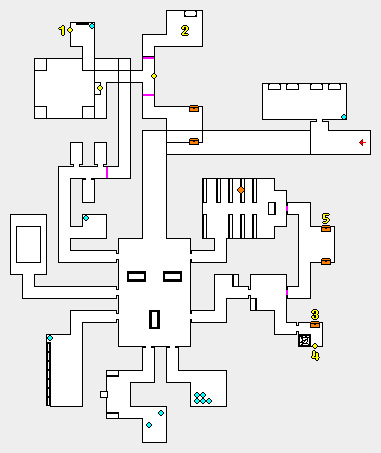
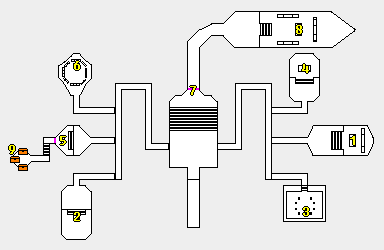
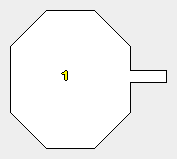
Shadow Guild
Home to the so-called Prince of Thieves, the Shadow Guild operates outside of Anthony Stone's jurisdiction. This Guildhall is not open to the public.
Objectives:
Nothing
Foe Groups:
1 Thief,
Burglar,
Rogue
2 Cutpurse,
Bounty Hunter,
Assassin
3 Genie,
Lesser Genie
U Rogue Leader
Rest-time Encounters:
Chance: 20%
then which
Group 1: 50%
Group 2: 50%
AVG Foe Lv: 18.04
AVG Foe HP: 94.21
Conditions: STOLEN ITEM,
DEAD
Loot:
Containers: 11
Trap Level: 3
Boosts: 5
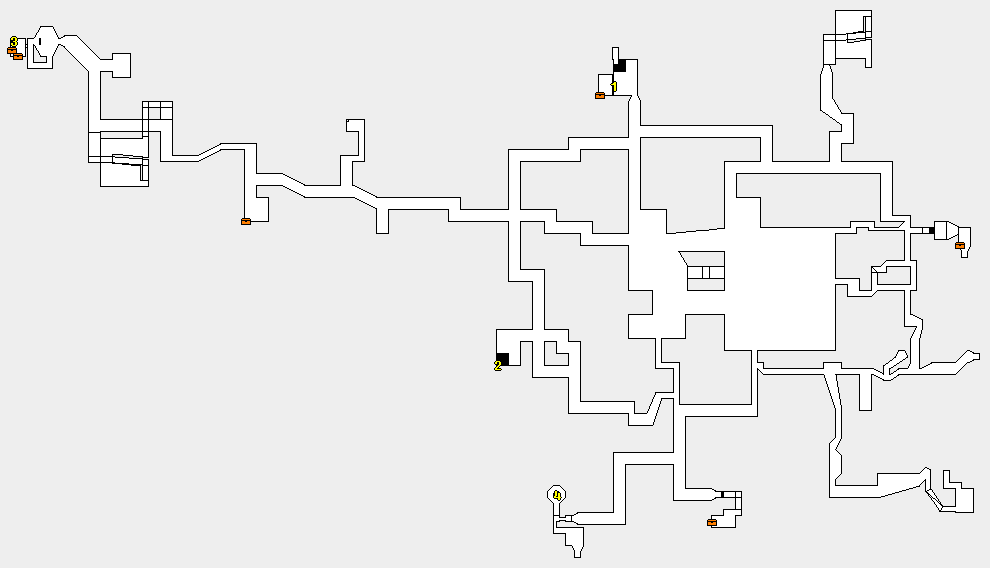
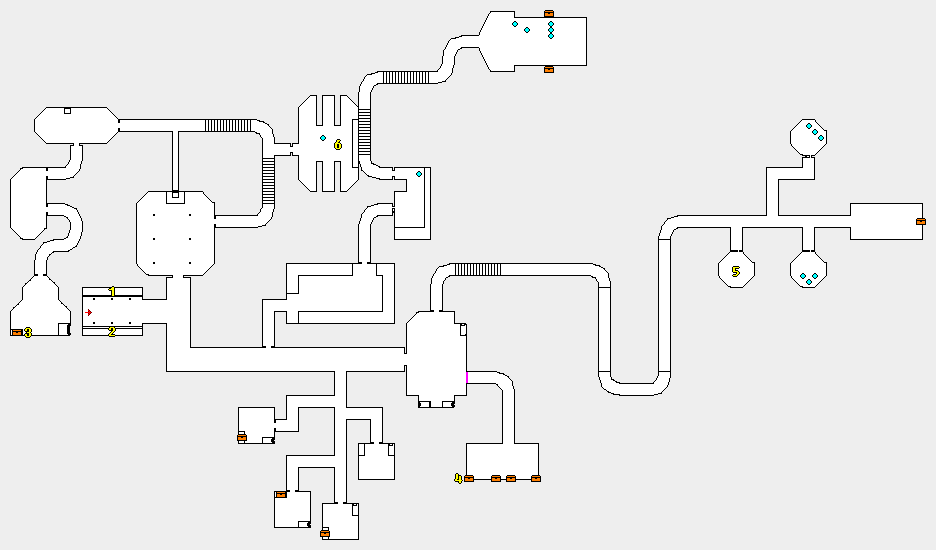
Walkthrough:
A series of traps and puzzles
Pit Trap:
Passage W at junction
Door to W
Passage W
Down Ramp to S
Door to E, treasure room
Backtrack to top of ramp
Switch on E wall
Backtrack to treasure room
Door (new) to W
Door to N at top of ramp
Ice Blast Trap:
Passage to N
Jump over the floor trap
Passage to E
Door to N
Passage to N
Electric Floor Traps:
Passage N
Jump over the Suspicious tiles
Door to E
Here is the room where you will fight a Genie later via teleport but for now you can clear the Rogue Leader so they will not be there later.
Backtrack S to a Passage E
Passage to W
Jump over Suspicious tiles for Barrels
Teleporter Puzzle:
Backtrack to Ice Blast trap
Passage to N
You need to hop around to all the suspicious tiles in a certain way and you will be teleported.
<diagram>
You will teleport back to the room where you defeated the Rogue Leader but now, there is a Genie. Defeat them. Incinerate works well.
Once you defeat the Genie, go back to the Teleporter Puzzle room and do it again, this second time you will fight one more Genie and you will now see a black portal on the S wall of the room. Touch this wall to teleport to the final treasure rooms.
Door to E
You cannot see me, hear me or touch me. I lie behind the stars and alter what is real, I am what you really fear, Close your eyes and I near. What am I?
Answer: Dark
(black teleport goes to entrance)
Door to S
What consumes rocks, levels mountains, destroys wood, pushes the clouds across the sky, and can make a young one old?
Answer: Time
(black teleport goes to entrance)
Door to W
I go through an apple, or point your way, I fit in a bow, then a target, to stay. What am I?
Answer: Arrow
(black teleport goes to entrance)
Passage N
Alive without breath, as cold as death, never thirsty ever drinking, all in mail never clinking, ever traveling, never walking, mouth ever moving, never talking. What am I?
Answer: Fish
(black teleport goes to Free Haven)
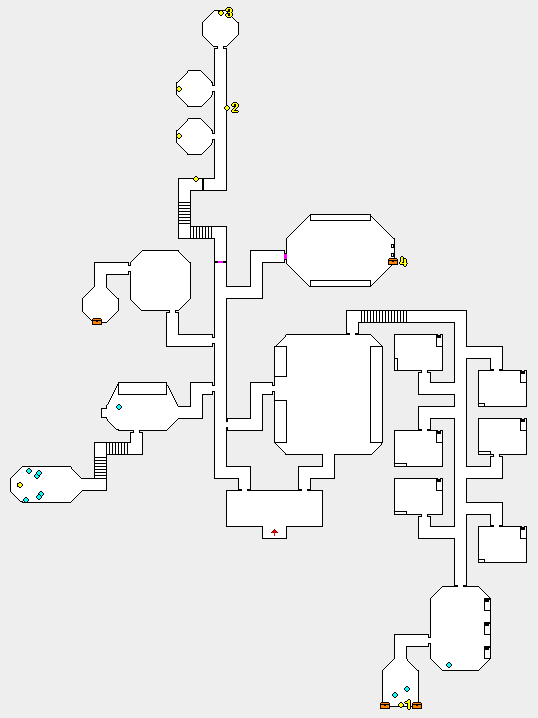
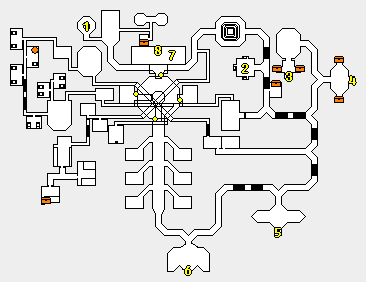
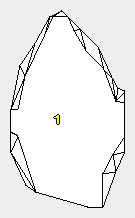
Corlagon’s Estate
Once the residence of Archmage Terrax, Corlagon received the Estate from Archibald for his services during the Succession Wars.
Objectives:
Retrieve the Crystal of Terrax
Foe Groups:
1 Ghost,
Evil Spirit,
Specter
2 Skeleton,
Skeleton Knight,
Skeleton Lord
3 Power Lich
Rest-time Encounters:
Chance: 20%
then which
Group 1: 20%
Group 2: 80%
AVG Foe Lv: 15.86
AVG Foe HP: 83.57
Conditions: AGED,
CURSED,
AFRAID,
UNCONSCIOUS
Loot:
Containers: 11
Trap Level: 1
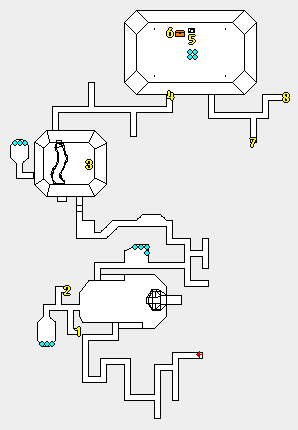
Walkthrough:
Door to N
A room with inactive fountain
Door to E
Passage W to treasure rooms
then backtrack to Passage N
Plan drop down in large room
(pull/clear fliers up to hallway)
(feather fall or jump down)
(can rest on N side of room)
Passage to W
Up the long steady ramp
Alcove to N, Flip Switch
Passage W to S
Secret Door to E
Cast Jump up the chimney
Door to S
First W, Flip Switch
Second E, Secret treasure room
Continue S to E
Passage N, Flip Switch
Continue to E to N
Passage to N on the Right
Check Chest: Crystal of Terrax
Hall of the Fire Lord
Ancient runes above the entrance attempt to scare away the casual visitor. Fresh goblin tracks lead into and out of the doorway.

Objectives:
Retrieve a Crystal Skull

Foe Groups:
1  Goblin,
   Goblin Shaman,
   Goblin King
2  Ogre,
   Ogre Raider,
   Ogre Chieftain
U  Fallen Defender

Rest-time Encounters:
    Chance:	30%
then which
   Group 1:	60%
   Group 2:     40%

AVG Foe Lv:	16.86
AVG Foe HP:	90.00
Conditions:     POISONED,
                DISEASED

Loot:
Containers:	11
Trap Level:	2

Walkthrough:
Talk to Lore of Fire
Collect Amber
Cast Feather Fall
Drop down hole and land on platform
Turn to face W
Fall into the West-most chute

Follow winding corridor around to a room with many grey doors to N. You want to face the yellow wicker door that says "Warded"

Use Amber on Door 1/2 (it wont open btw)
Passage to S in SW corner of room
Up a ramp into a room with a Pit
Fall into the Pit
E and fall into another Pit

Now in a large room with Green floor. There are cages here.  There are many doors on the N wall--enter the right-most door and follow the winding corridor until you see a blue floor.  At the end of the blue floor corridor is the 2/2 Ward door.  Get close enough to door to use Amber without falling into the pit.

Now both Ward doors are open
Backtrack to the green floor
Drop into either Pit on E wall
Drop all the way down
Defeat Fallen Defender
Loot Fallen Defender for Chest Key
Jump back to room with Green floor

2nd from Right door has buff well
Enter 2nd from Left door
Drop down Pit
Check Chest for Amber
Door to N
Door to N
Use Amber on Stone Face
You are at the Entrance

You can heal up here if you want but we only have another short excursion to collect the Crystal Skull.

Drop down the Pit to platform
Drop down the Pit to N
Passage between two Stone Faces
Door to E
Check Chest for Crystal Skull
Backtrack to the 2 Stone Faces
Use Amber on a Stone Face
Talk to Lord of Fire turn in Quest
Silver Helm Outpost
This small post acts as an advance base for the Fraternal Order of Silver. From here, they are able to patrol Mist in their conquest of evil.

Objectives:
Rescue Melody Silver
Find Gharik's Laboratory Key

Foe Groups:
1  Swordsman,
   Expert Swordsman,
   Master Swordsman
2  Novice Monk,
   Initiate Monk,
   Master Monk
3  Guard,
   Lieutenant,
   Captain

Rest-time Encounters:
    Chance:	20%
then which
   Group 1:	20%
   Group 2:     30%
   Group 3:     50%

AVG Foe Lv:	18.33
AVG Foe HP:	94.33
Conditions:     BROKEN ARMOR,
                BROKEN WEAPON,
		WEAKNESS

Loot:
Containers:	5
Trap Level:	3
Boosts:	        10

Walkthrough:
N into Barracks for a Barrel
Back into main passage, down ramp and enter a large room with 7 doors in all directions.

South Wall, Left door
Food in sacks, Liquid Barrels
Back to large room
South Wall, Right door
Food in sacks, Liquid Barrels
Back to large room

West Wall, Left-most door, XP only
West Wall, Middle door, XP only

West Wall, Right-most door
Hallway with 3 doors
East wall is secret door
E,N and up the ramp
N into alcove, Barrel and Switch
Walk up the steps up to top
At the Mural, go N, secret door
Collect Melody Silver
Back to Mural, go S, secret door
2 Chests, back to Mural
Touch the Mural

Heal up, turn in Rescue quest, come back when you want the Key to Gharik's Laboratory.

Back in large room with 7 doors
East Wall, Right-most door
East door, room with vaulted ceilings
East door to small room with chest
Check Chest: Enemies List
Switch here also, hit it
Back to vaulted ceiling room
New passage E is available
Check Chest: Key to Gharik's Forge
Dragoon’s Caverns
The original name of these caverns has been lost in time. Now, it is named for the group of bandits that base their operations from it.

Objectives:
Retrieve the Harp

Foe Groups:
1  Thug,
   Ruffian,
   Brigand
2  Fighter,
   Soldier,
   Veteran
3  Ooze,
   Acidic Ooze,
   Corrosive Ooze

Rest-time Encounters:
    Chance:	20%
then which
   Group 1:	60%
   Group 2:     40%
   Group 3:     0%

AVG Foe Lv:	19.11
AVG Foe HP:	99.44
Conditions:     BROKEN ITEM,
                POISONED,
		BROKEN WEAPON

Loot:
Containers:	8
Trap Level:	3
Boosts:         3

Walkthrough:
Turn the corner and clear first room
Door to E
End of hall, Door to E
Secret Door to N
Press Both Switches
Back to long hallway
Door to S
Bottom of ramp
Door to S
Passage to S
Check Chest
Touch Mural on N wall, +10 LCK
Backtrack to junction
Backtrack to where you came down ramp
Door to W
Check Barrels

Down Ramp is nothing you need, but you can explore the water area for minor loot and practice fighting Oozes.

Backtrack up the ramp to entrance hall
Exit and heal up if needed then back

Door to S into red walled room
Door to N
Elevator Down
Door to W
Passage to W is chested dead end
Passage N
Door to N
Flip the Switch
Backtrack tiny bit for new passage W
E into room with bridge
(if you fall, you will be with Oozes)
Door to E
E at junction
Passage to W
Down Elevator
Door to W
Door to N
E to chested dead end
Door to W
Door to S
Double-doors to S
ONLY open 2nd from Left
Collect the Harp
Tomb of Ethric the Mad
Ethric, the first Sorcerer seeking life after death, still walks about his tomb, the leader of a host of undead servants. At least, that's how the rumor goes.

Objectives:
Retrieve the Skull of Ethric

Foe Groups:
1  Lich,
   Greater Lich,
   Power Lich
2  Skeleton,
   Skeleton Knight,
   Skeleton Lord
3  Ghost,
   Evil Spirit,
   Specter
U  Ethric

Rest-time Encounters:
    Chance:	10%
then which
   Group 1:	30%
   Group 2:     40%
   Group 3:     30%

AVG Foe Lv:	20.10
AVG Foe HP:	146.50
Conditions:     AGED,
                CURSED,
		AFRAID,
		UNCONSCIOUS

Loot:
Containers:	18
Trap Level:	5

Walkthrough:
Ride W Elevator
N niche in room to S has Gold
S niche in room to W has Item
Passage to N to room
Flip the Switch on N wall
Backtrack to first room

Ride E Elevator
E niche in room to N has Gold
W niche in room to N has Item
Flip the Switch on E wall
Backtrack to first room

Ride N Elevator
Enter room with fireballs
S niche in room to W has Gold
Backtrack to Fireball room
Door to E
N niche in room to N has Item
Backtrack to Fireball room
W (left) Passage to N
N niche in room to W has Gold
S niche in room to W has Item
Backtrack to Fireball room

E (right) Door to N
Passage to E at Junction
Passage to E to room with Liches
Flip the Switch on E wall
Passage to N
Defeat Ethric
Collect Ethric's Skull
Coffins are trapped with loot

Backtrack to Junction
Passage to W
W niche has Gold
E niche has Gold
Coffin is trapped with loot
Passage to N
Coffins are trapped with loot
Icewind Keep
Originally used to keep creatures from escaping the Frozen Wastelands, now the keep prevents traffic to and from Castle Stromgard and town of White Cap.

Objectives:
Retrieve Dragon Tower Keys

Foe Groups:
1  Ogre,
   Ogre Raider,
   Ogre Chieftain
2  Guard,
   Lieutenant,
   Captain

Rest-time Encounters:
    Chance:	20%
then which
   Group 1:	40%
   Group 2:     60%

AVG Foe Lv:	21.00
AVG Foe HP:	112.33
Conditions:     POISONED,
                BROKEN ITEM

Loot:
Containers:	15
Trap Level:	5
Boosts:         17

Walkthrough:
Wide hall junction
Wide passage to W
Doors W have Loot and Liquid Barrels
Door to N
Door on Left
Flip the Switch
Backtrack to Wide hall junction
Wide passage to E
Doors E have Loot and Liquid Barrels
Door to N
Door on Right
Flip the Switch
Backtrack to Wide hall junction
Passage to N (new)
Examine the smaller throne
Flip the Switch are arm rest
Treasure Room to E
Temple of the Moon
Originally a place of worship for the Church of the Moon, this old sanctuary is now home to Cedric Drother's group of Druids.

Objectives:
Visit the Altar of the Moon at Midnight of a Full Moon

Foe Groups:
1  Druid,
   Great Druid,
   Grand Druid
2  Cobra,
   King Cobra,
   Queen Cobra
3  Medusa,
   Medusa Enchantress,
   Gorgon

Rest-time Encounters:
    Chance:	20%
then which
   Group 1:	40%
   Group 2:     60%
   Group 3:     30%

AVG Foe Lv:	22.56
AVG Foe HP:	137.44
Conditions:     STONED,
                POISONED,
		DRAINED SP

Loot:
Containers:	3
Trap Level:	2

Walkthrough:
You start in a Central Chamber and the door to the N is barred.  A plaque reads: "Life above all, Accuracy before Might, Endurance before Speed, and finally, Luck."

The door to E leads to 3 more doors each with an altar. The first door is Endurance, second door is Life, third door is Might.

The door to the W leads to 3 more doors each with an altar.  The first door is Luck, the second door is Speed, the third door is Accuracy.

Touch the Altar of Life
Touch the Altar of Accuracy
Touch the Altar of Might
Touch the Altar of Endurance
Touch the Altar of Speed
Flip the switch behind Altar of Speed
Treasure room is revealed
Touch the Altar of Luck

Door to N in Central Chamber
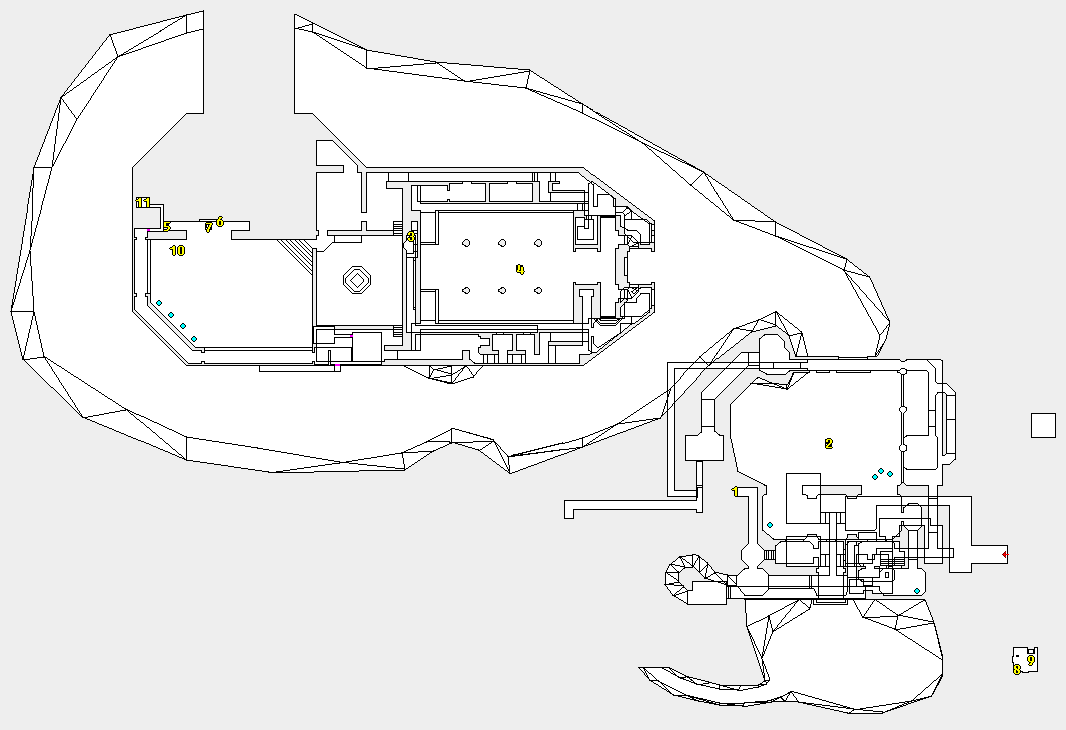
Superior Temple of Baa
The focal point of all Baa worship in Enroth, the Superior Temple only allows followers of Baa inside.

Objectives:
Find a cure for Slicker Silvertounge which is a Letter from Zenofex, exposing an evil plot.

Foe Groups:
1  Acolyte of Baa,
   Cleric of Baa,
   Priest of Baa
2  Druid,
   Great Druid,
   Grand Druid
3  Sorcerer,
   Magician,
   Warlock

Rest-time Encounters:
    Chance:	30%
then which
   Group 1:	70%
   Group 2:     20%
   Group 3:     10%

AVG Foe Lv:	23.56
AVG Foe HP:	141.44
Conditions:     DRAINED SP,
                INSANE

Loot:
Containers:	8
Trap Level:	4
Boosts:         MANY

Walkthrough:
In order to enter, you need to have the Cloak of Baa. The cloak is given to you by Wilbur Humphrey after returning Kilburn's Shield. Speak at the council and then back to Humphrey.

In order to open any doors inside the temple you need a character with Expert Perception -- only that character can interact with the temple.

Door to W, visible from entrance
Passage to S
A step W but continue S
Door to E

Search room for Gongs but you will need to find High Sorcerer's Key and High Cleric's Key in order to open the Chest on the table.

Door to E
Passage S to next junction
Passage S then all the way E, then S
Door to S

Clear room for High Cleric's Key.

Backtrack to the room with the Chest
W then N to next junction
Passage W all the way
Door to W

Clear room for High Sorcerer's Key

Backtrack to the room with the Chest
Open the chest
Letter from Zenofex is Quest item

You may go now and return to Wilbur Humphrey.. or clear the dungeon first for loot, boosts, and XP.
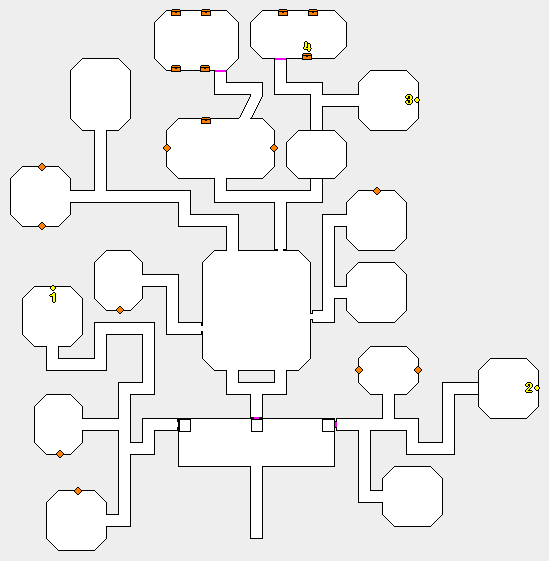
The Monolith
This foreboding structure radiates magical power. Druids from all over Enroth make periodic pilgrimages to visit this sacred place.

Objectives:
Deface the altar for Eleanor Vanderbilt

Foe Groups:
1  Druid,
   Great Druid,
   Grand Druid
2  Rock Beast,
   Earth Spirit,
   Earth Elemental
3  Water Beast,
   Water Spirit,
   Water Elemental

Rest-time Encounters:
    Chance:	20%
then which
   Group 1:	80%
   Group 2:     10%
   Group 3:     10%

AVG Foe Lv:	24.78
AVG Foe HP:	144.33
Conditions:     DRAINED SP,
                UNCONSCIOUS,
		BROKEN ITEM,
		BROKEN ARMOR

Loot:
Containers:	9
Trap Level:	5

Walkthrough:
This dungeon is a series of rooms, there is only one way to go.  Search everything for Gold and to open doors. Nothing is trapped.
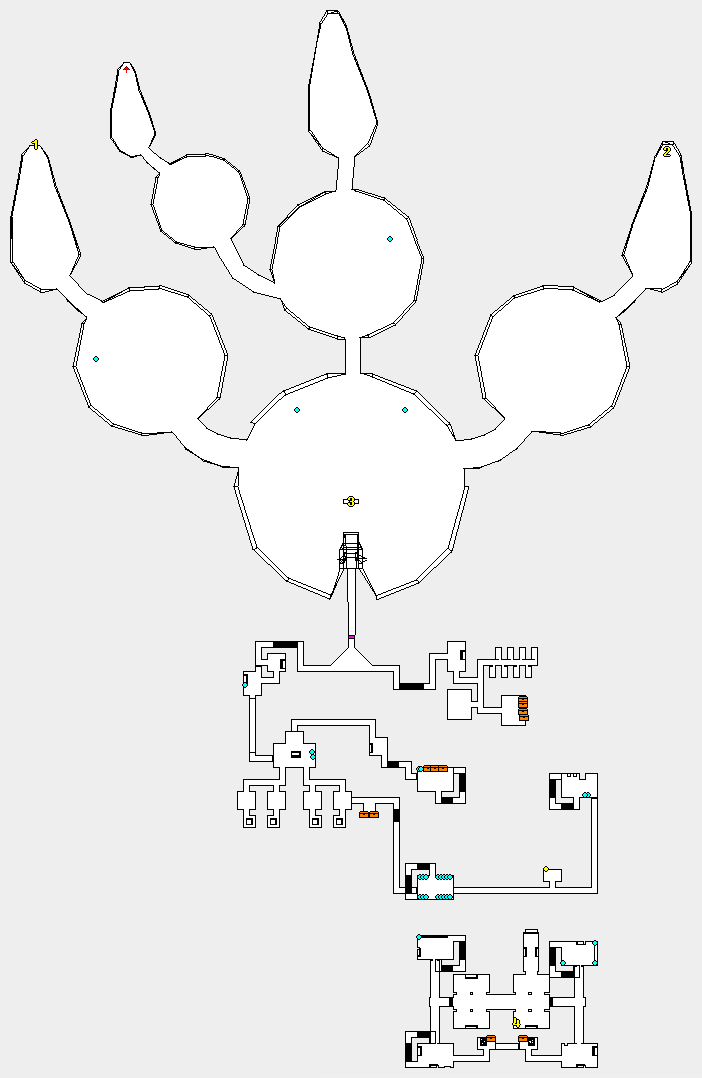
Lair of the Wolf
A foul smell wafts from the entrance to these caves. The howl of a wolf can be heard from the distance.

Objectives:
Destroy the werewolf's altar.

Foe Groups:
1  Wolfman,
   Werewolf,
   Greater Werewolf
2  Swordsman,
   Expert Swordsman,
   Master Swordsman
3  Ooze,
   Acidic Ooze,
   Corrosive Ooze
U  Werewolf Leader

Rest-time Encounters:
    Chance:	25%
then which
   Group 1:	100%

AVG Foe Lv:	25.60
AVG Foe HP:	150.10
Conditions:     DISEASED,
		BROKEN ITEM,
		UNCONSCIOUS,
		POISONED

Loot:
Containers:	11
Trap Level:	6
Boosts:		30

Walkthrough:
Clear the largest circle room
Explore the tip of the W appendage
Talk to Ghost of Balthasar or Quest
Explore the tip of the E appendage
Collect Pearl of Purity
Backtrack to largest circle room
Touch the Wolf Altar

You can turn in quest with Maria Trapan or continue exploring for loot and XP.

Enter the long corridor to S
Passage E is chested dead-end
Passage W then S
Door to E to room with table
Door to N is chested dead-end

Take the east-most passage to S
Take the east-most door to S
Secret door to E, at meat hooks
Door to E, many barrels
Passage N goes upstairs

Door to E for a Chest
Secret door to E, another Chest
Passage S
Door to E
Door to N
East passage at junction
Defeat Werewolf Leader
Collect Pearl of Putrescence
Turn in Quest with Ghost of Balthasar
Return Pearl of Purity to Humphrey
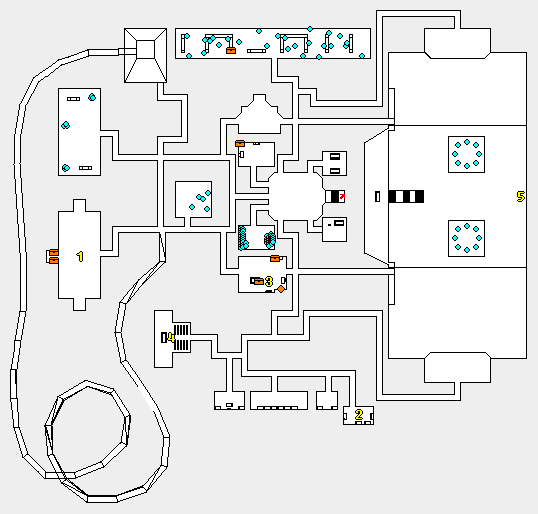
Silver Helm Stronghold
The headquarters of the Fraternal Order of Silver and Sir John Silver's home. Silver Helms from this Stronghold patrol Silver Cove in search of evil.


Objectives:
Retrieve Ankh

Foe Groups:
1  Swordsman,
   Expert Swordsman,
   Master Swordsman
2  Fighter,
   Soldier,
   Veteran
3  Sorcerer,
   Magician,
   Warlock

Rest-time Encounters:
    Chance:	20%
then which
   Group 1:	40%
   Group 2:     40%
   Group 3:     20%

AVG Foe Lv:	26.00
AVG Foe HP:	147.86
Conditions:     BROKEN WEAPON,
                INSANE

Loot:
Containers:	4
Trap Level:	4
Boosts:         6

Walkthrough:
Clear the Central Chamber to S
Door to W for Liquid Barrels
Door to E for chestless dead-end
Door to S
1st passage E
Speak with Ghost of John Silver
N for a chested dead-end
Secret Wall to S of John Silver
Door to W
Passage to S
Clear room
Collect the Ankh
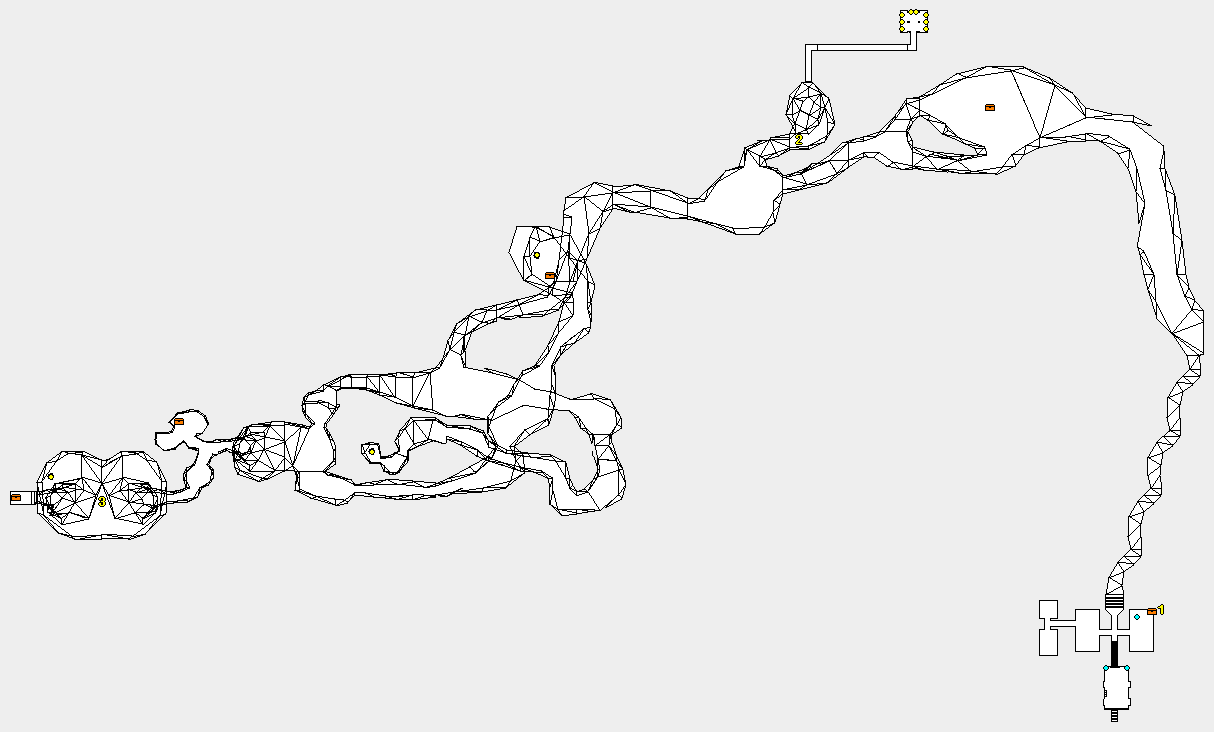
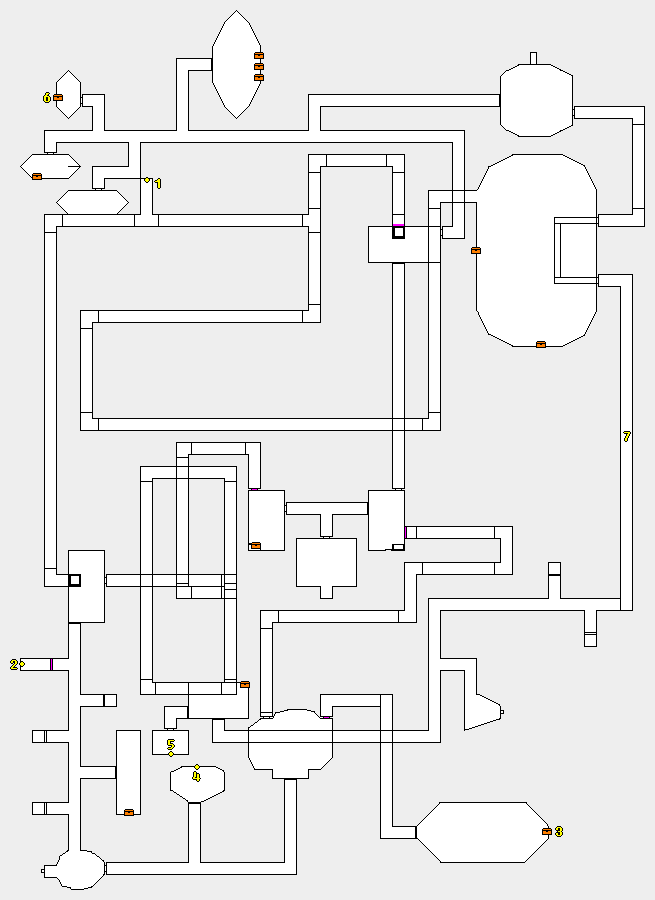
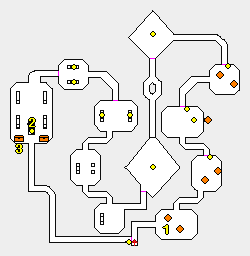
Snergle’s Iron Mines
The largest dwarven mine in Enroth, Snergle has claimed has claimed it in his succession to the dwarven throne.

Objectives:
Retrieve Snergle's Chamber Key

Foe Groups:
1  Dwarf,
   Dwarf Warrior,
   Dwarf Lord
2  Ooze,
   Acidic Ooze,
   Corrosive Ooze
3  Devil Spawn,
   Devil Worker,
   Devil Warrior

Rest-time Encounters:
    Chance:	20%
then which
   Group 1:	50%
   Group 2:     50%

AVG Foe Lv:	26,11
AVG Foe HP:	168.11
Conditions:     DISEASED,
                BROKEN ITEM,
		POISIONED,
		BROKEN ARMOR,
		DRAINED SP

Loot:
Containers:	11
Trap Level:	3
Boosts:         13

Walkthrough:
At first junction, Double-door to N
Door to E
At junction,
Door to E (open with High INT)
Search for books
Exit room to W
continue up to N then W
Defeat Oozes
Door to S, follow path to a Cabinet
Obtain Cell Key
Backtrack to the first junction
Wide passage S to E

First door to N for chested dead-end
First door to S for chested dead-ends

Door to E
Secret Door E wall, chested dead-end
Door to N
First Door to S is Ghim Hammond
Door to N for barrels
Second Door to S for barrels
E for chested dead-end
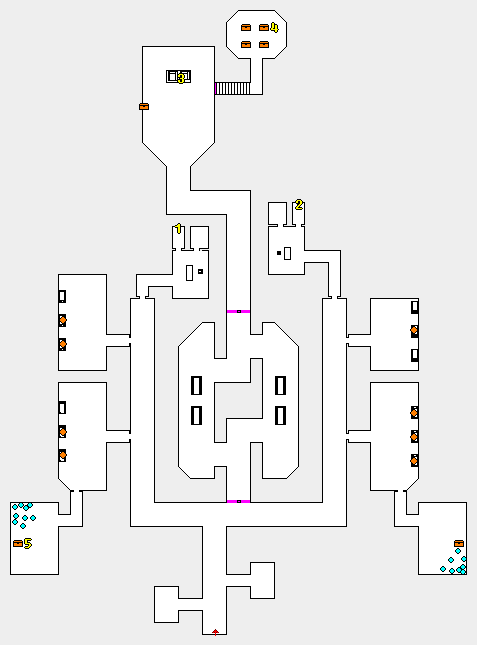
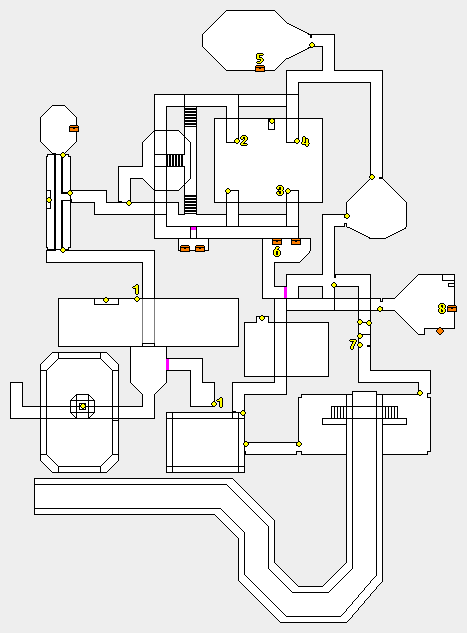
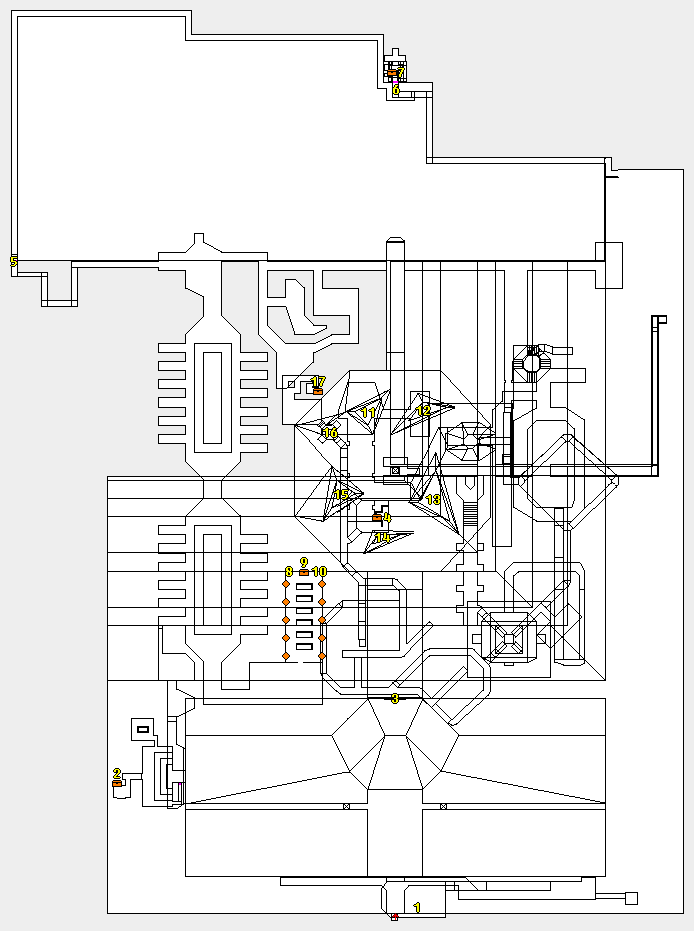
Supreme Temple of Baa
The temperature rises steadily as you approach the doors, the smell of sulfur and ash strong. This place resembles a hideout more than a temple.

Objectives:
Collect Memory Crystal Alpha
Defeat Slicker Silvertounge

Foe Groups:
1  Acolyte of Baa,
   Cleric of Baa,
   Priest of Baa
2  Devil Spawn,
   Devil Worker,
   Devil Warrior
3  Fire Beast,
   Fire Spirit,
   Fire Elemental
U  Slicker Silvertounge

Rest-time Encounters:
    Chance:	30%
then which
   Group 1:	90%
   Group 2:     0%
   Group 3:     10%

AVG Foe Lv:	8.31
AVG Foe HP:	32.58
Conditions:     DISEASED,
                DRAINED SP,
		BROKEN ITEM
Loot:
Containers:	8
Trap Level:	4

Walkthrough:
W for a portal to Free Haven Sewer

This dungeon is mostly linier, just keep clearing as you make you way through. You will encounter 5 Altars each with a Gong. You can take the gongs.

If you touch every Altar one character can get +10 Elemental Resistance (perm). Whole party takes damage when touching the altar.

Continue until you reach the lava pit. Use the bridges to reach the next switch, Flip the Switch and work your way around.  In the N room, find the Memory Crystal Alpha.  Slicker Silvertounge is also here.
Castle Alamos
The first fortress dedicated to magical research, its remote location provided secrecy for the mages and protection for the populace in the event of an accident.

Objectives:
Collect Memory Crystal Beta

Foe Groups:
1  Sorcerer,
   Magician,
   Warlock
2  Magyar,
   Magyar Soldier,
   Magyar Matron
3  Dust Devil,
   Twister,
   Air Elemental

Rest-time Encounters:
    Chance:	10%
then which
   Group 1:	30%
   Group 2:     40%
   Group 3:     30%

AVG Foe Lv:	8.31
AVG Foe HP:	32.58
Conditions:     POISONED,
                DISEASED

Loot:
Containers:	14
Trap Level:	5
Boosts:   	14

Clues:
Etched into the tree a message reads: The first is half the forth plus one, better hurry or you'll be done!

Etched into the tree a message reads: The second is next to the third, oh so pretty like a bird!

Etched into the tree a message reads: The third is the first of twenty six, A through Z you'll have to mix!

Etched into the tree a message reads:
The forth is eight from the end, Archibald really is your friend!

Etched into the tree a message reads: The fifth is twice the second, five letters in all I reckon!

Walkthrough:
E and SE from the entrance
reach a large pit, drop to bottom
the fireball shoots to the first tree
back to the central room with fireball
Come up the ramp, then W to S
Push in the Switch at the second tree
Passage S then E, up ramp to N
Up the broken floor ramp to SE
Take the S turn at yellow brick road
Follow this one way passage to a pool
Ignore the pool and go S to a tree
To NW from tree is an elevator
Elevator near 5 leads to
Narrow ledge to W above cages
Answer "JBARD" for riddle
Collect Memory Crystal Beta

You could bail or you can press on to the Treasure Room

Treasure Room is south of the large room full of Warlocks, Magicians, and Elementals. Use Jump.  Requires Treasure Room Key which is in a chest inset on the east wall of the octagonal room.  The treasure room has 8 chests.
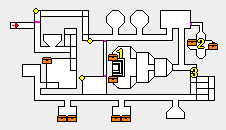
Agar’s Laboratory
This laboratory is the birthplace for countless horrid experiments. Its remote location was chosen for both safety and secrecy.

Objectives:
XP and +50 INT boost

Foe Groups:
1  Flying Eye,
   Terrible Eye,
   Maddening Eye
2  Agar's Pet,
   Agar's Monster,
   Agar's Abomination
U  Agar

Rest-time Encounters:
    Chance:	30%
then which
   Group 1:	80%
   Group 2:     20%

AVG Foe Lv:	29.29
AVG Foe HP:	197.29
Conditions:     PARALYZED,
                STONED,
		INSANE,
		AFRAID,
		ASLEEP

Loot:
Containers:	4
Trap Level:	1

Walkthrough:
N to first central chamber
Passage to E, press Button
Clear way back to central chamber
Passage to W, press Button
Clear way back to central chamber
Take the elevator down

N to next central chamber
Passage to E, press Button
Clear way back to central chamber
Take the elevator down

Door to W
Eastern Door to N for final chests

Cauldron grants +50 INT IF CURSED

Easiest way to get cursed is to Set a Beacon then Town Portal to White Cap and Fly over the mountains to Castle Stone.. unless you have cleared them, the Harpies will surely Curse everyone from nearly infinite range. Then Recall to your Beacon and tap  the cauldron. You need to ONLY have CURSED condition so Cure up first.
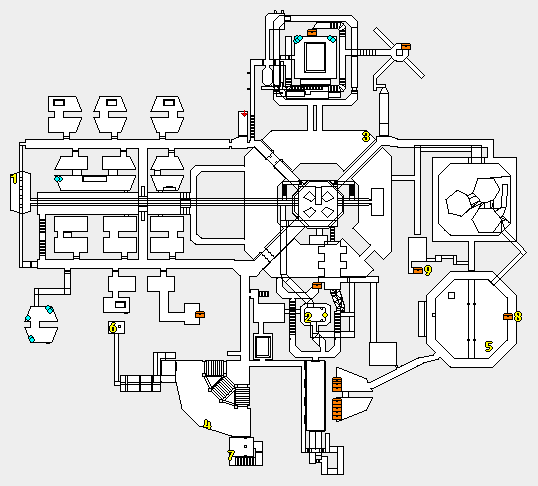
Castle Darkmoor
The temperature drops as you approach the gates to this castle. Legend holds that this castle contains the knowledge of how to transcend death as undead.

Objectives:
Destroy the Book of Liches
Collect Memory Crystal Delta

Foe Groups:
1  Lich,
   Greater Lich,
   Power Lich
2  Flying Eye,
   Terrible Eye,
   Maddening Eye
3  Ogre,
   Ogre Raider,
   Ogre Chieftain

Rest-time Encounters:
    Chance:	20%
then which
   Group 1:	10%
   Group 2:     10%
   Group 3:     80%

AVG Foe Lv:	30.33
AVG Foe HP:	194.33
Conditions:     POISONED,
                INSANE,
		AFRAID,
		ASLEEP

Loot:
Containers:	3
Trap Level:	5
Boosts:	        9

Clues:
The crimson embers will lead the way.

Walkthrough:
Clear your way to the large chamber with a huge Blue Cube.  Acid Burst and Implosion work pretty well against the Eyes with Incinerate for the Liches. Do not waste a bunch of SP on buffs because they will be dispelled. The cauldrons will grant Magic Resist +1 permanent for 1 character.

Clear everything before you touch the cube.  There is a second level and a lot of side passages around the large chamber.  Clear it all and heal up then touch the cube.

Big fight with 8 Eyes inside the cube. If you can't get it done in one go and need to touch the blue walls to teleport out, know that you will teleport to a large room full of other foes.. unless you cleared it first!

There is a switch you need to Flip to changed the cube to a Red Cube.  From where the blue cube teleports you to, head N, then W up the stairs, then N to the dead end with a plaque.  Read the plaque, flip the switch.

Make your way back to the large chamber with the Cube, notice it is now red.  Touch it!  Message received "The way has been cleared"  A large passage opened to the North into a new very large chamber.  Clear the chamber around the large building first then head up the ramp on the S side. Secret door at the top of the ramp for some Books and Deck of Fate.

Now clear the inside of the large building where the 2nd blue cube is. You will find a area to the W where there is an invisible barrier.

To remove the barrier, come to the front entrance of the large building.  Go all the way W till you see ramps up to N and S.  Take the S ramp up then back to the E along the balcony, find the ramp Down, go down. Once down the ramp find the north-most corridor heading west.. then up a narrow ramp.  Read the plaque. Toggle the switch.

Touch the red cube. Go back to invisible barrier.  Clear the western room. Note: foes will not make range attacks through  doorway where the invisible barrier used to be.. that can help.

Collect the Memory Crystal Delta
Read the plaque
Touch the cube
Destroy the Book of Liches

Loot Sarcophagus (rob Dead) hits Rep
You can save-scum the loot drops
W is always Waist
E is always Feet
S is always Head
Gharik’s Forge
Fire Elementals assisted Gharik in his attempts to create powerful items here. A handful of his students continue his experiments.

Objectives:
Retrieve the Hourglass of Time

Foe Groups:
1  Sorcerer,
   Magician,
   Warlock
2  Fire Beast,
   Fire Spirit,
   Fire Elemental

Rest-time Encounters:
    Chance:	25%
then which
   Group 1:	40%
   Group 2:     40%
   Group 3:     20%

AVG Foe Lv:	31.33
AVG Foe HP:	205.50
Conditions:     BROKEN ITEM,
                INSANE

Loot:
Containers:	8
Trap Level:	8

Walkthrough:
Down the circle ramp to the hallway
Secret door on E wall
Toggle lever to extend bridge

In the fiery room with the wooden bridge the goal is to use the switches to open the stone doors and move the bridge to the E side of the room.

This dungeon is otherwise, pretty linier. There are a few secret doors that lead to chests. The teleport tiles that are in the bottom of fire pit rooms are just a way to get out, no need to go down there on purpose.

You will need Key to Gharik's Forge found in Silver Helm Outpost.  Find the Hourglass of Time in the final room.
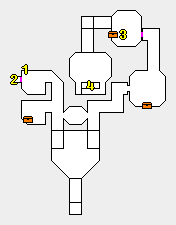
Temple of the Sun
This forgotten shrine of the Church of the Sun still stands. For all of its time in the humid jungle, the temple remains in surprisingly good condition.

Objectives:
Retrieve the Crystal Chalice

Foe Groups:
1  Novice Monk,
   Initiate Monk,
   Master Monk
2  Minotaur King

Rest-time Encounters:
    Chance:	15%
then which
   Group 1:	100%

AVG Foe Lv:	32.50
AVG Foe HP:	279.25
Conditions:     WEAKNESS

Loot:
Containers:	9
Trap Level:	2
Boosts: 	11

Walkthrough:
Expect a volley of magic upon entry but Inferno or Mass Curse is a solid response. You can also dip into one of the alcoves for some cover. The 45 degree corners near the altars are secret doors, NE leads to bedroom.

The Sacred Chalice is in the cabinet in the bedroom.  You can grab it without confronting the Minotaur King if you like. The Minotaur King protects the final treasure room which is where all the barrels of liquid and most chests are located.
Warlord’s Fortress
Muted sounds of clashing metal and loud voices emanate from this imposing fortress. No one would dare assault the Warlord's home.

Objectives:
Defeat the Warlord

Foe Groups:
1  Thug,
   Ruffian,
   Brigand
2  Fighter,
   Soldier,
   Veteran
3  Death Knight,
   Doom Knight,
   Cuisinart

Rest-time Encounters:
    Chance:	20%
then which
   Group 1:	80%
   Group 2:     20%

AVG Foe Lv:	33.00
AVG Foe HP:	258.00
Conditions:     AFRAID,
                BROKEN WEAPON

Loot:
Containers:	17
Trap Level:	6
Boosts:	        23

Walkthrough:
Touching the doors in this dungeon will teleport you to other doors but you can just keep touching the doors to cycle the destinations. The concept is not very complicated, one of the doors that leads to the East will open as normal.

The southern-most barracks has a secret door to the west which leads to a treasure room.

Find 2 Storage Room keys

In the most NE room there is a door that requires Perception to open.. in it find the Discharge Papers, required for Osric's quest.

Castle Kriegspire
Kriegspire no longer rests between its lakes, the earth around the castle was raised to prevent the creatures inside from escaping.

Objectives:
Retrieve Jeweled Egg
Retrieve Memory Crystal Epsilon

Foe Groups:
1  Minotaur,
   Minotaur Mage,
   Minotaur King
2  Agar's Pet,
   Agar's Monster,
   Agar's Abomination
3  Flame Drake,
   Frost Drake,
   Energy Drake
U  Lurch

Rest-time Encounters:
    Chance:	20%
then which
   Group 1:	80%
   Group 2:     20%

AVG Foe Lv:	38.50
AVG Foe HP:	434.50
Conditions:     PARALYZED,
                STONED,
		BROKEN ITEM
Loot:
Containers:	8
Trap Level:	6
Boosts:	        7

Walkthrough:
This place is pretty straight forward. Take your time and save often as the Minotaur Kings can cast Finger of Death.

Careful about finding yourself in the one of the 4 arena.. many foes will spawn.

You can fight through the windows to prevent taking any damage.  You can even pull foes to the East side of map to the windows.

Double-door north leads to Curator of Kreigspire, a lot of Drakes, and the Guardian of Kriegspire.  A lot of loot.  You can safely ignore the Curator and Guardian if you want.

There is a switch you need to press in the center of the 4 arena, up top on a pillar.  This will open the way that was blocked by horizontal bars.

You can collect Memory Crystal Epsilon without disturbing Lurch if you like.. but more fun,

You can let Lurch out of his very small room, you can jump down to where the barrels are (and the Memory Crystal Epsilon).. and shoot Lurch safely from below.  There is a small black square to port back up (or Jump).

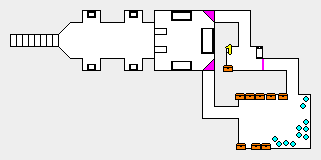
Devil’s Outpost
The faint smell of brimstone and the sound of creatures talking in a strange language drift from the entrance of this cave.

Objectives:
Retrieve Devil's Plans

Foe Groups:
1  Devil Spawn,
   Devil Worker,
   Devil Warrior
U  Devil of Baa

Rest-time Encounters:
    Chance:	0%
then which
   Group 1:	0%

AVG Foe Lv:	45.00
AVG Foe HP:	365.00
Conditions:     DISEASED,
                DRAIN SP

Loot:
Containers:	0
   Barrels:	0
Trap Level:	1

Walkthrough:
Go in and clear it out. There are about 15 foes inside including the Devil of Baa. Acid Blast, Implosion, and Physical will get it done simple enough.
Dragon’s Lair
A large dragon obviously makes his residence in these caves. The undead near his home might have been adventurers seeking the dragon's treasure.

Objectives:
Slay Longfang Witherhide

Foe Groups:
U  Longfang Witherhide

AVG Foe Lv:	80
AVG Foe HP:	800
Conditions:     none

Loot:
Way less loot here than you might expect in a Dragon's Lair.

Walkthrough:
Resists Fire/Cold based attacks. Acid Blast, Implosion, and Physical will get it done simple enough.
Temple of the Snake
The forest of statues scattered about seems to magnify the silence on Star Island. Certainly, the rumors of medusas living in this temple are true.

Objectives:
Rescue Emmanuel
Find Horn of Ros
Defeat your childhood idle, Q

Foe Groups:
1  Medusa,
   Medusa Enchantress,
   Gorgon
2  Gold Dragon,
U  Q

Rest-time Encounters:
    Chance:	30%
then which
   Group 1:	100%

AVG Foe Lv:	64.00
AVG Foe HP:	3628.80
Conditions:     STONED,
                BROKEN ITEM

Loot:
Containers:	9
Trap Level:	5

Walkthrough:
Pretty straight forward dungeon.  It can help to save during combat in case you need to back up a few turns.  Physical damage wins the day vs Q and Gold Dragon. You can also avoid the Dragon if you like just move past him quickly.
Caves of the Dragon Riders
These caves house a strange alliance between human warriors and dragons. The Dragon Towers were built in the towns to ward off these raiders.

Objectives:
Loot

Foe Groups:
1  Death Knight,
   Doom Knight,
   Cuisinart
2  Wyrm,
   Giant Wyrm,
   Great Wyrm

AVG Foe Lv:	60
AVG Foe HP:	556.67
Conditions:     POISONED,
                AFRAID

Loot:
Containers:	13
Trap Level:	10

Walkthrough:
6 large chambers with Loot Containers and a lot of foes
Control Center
Objectives:
Learn the Blaster Skill
Obtain Blaster Weapons

Foe Groups:
1  Patrol Unit,
   Enforcer Unit,
   Terminator Unit

Rest-time Encounters:
    Chance:	50%
then which
   Group 1:	100%

AVG Foe Lv:	70.00
AVG Foe HP:	726.67
Conditions:     BROKEN ITEM,
                ERADICATED

Loot:
Containers:	14
Trap Level:	8

Walkthrough:
Similar to VARN Defenders, these Units have great magic defenses and the Terminators will grant ERADICATED. Rely almost exclusively on Implosion and Physical attacks. If you are getting unlucky, you can save-scum the combats with a Terminator to work around getting eradicated.

Take the initial ramp down to E and N then inspect the Control Panel to learn Blaster Skill for all your party.

Go back up the ramp
Enter the room to the W
Check the chest for a Blaster

Optionally, now that you have the Blaster skill and a Blaster, go and get Master Blaster skill for those you plan to outfit with a blaster. Lloyd's back and let's go.

Take the S door into another room with a chest and potential blaster.

There are 4 chest on the wester part of the map. Keep working your way around counter-clockwise.
Tomb of VARN
This pyramid seems to be made of a strange, weathered metal. It appears to be partially buried in the sand.

Objectives:
Retrieve the Control Cube

Foe Groups:
1  Defender of VARN,
   Sentinel of VARN,
   Guardian of VARN
2  Genie,
   Djinn,
   Efreet
3  Patrol Unit,
   Enforcer Unit,
   Terminator Unit

Rest-time Encounters:
    Chance:	10%
then which
   Group 1:	100%

AVG Foe Lv:	55,22
AVG Foe HP:	498.89
Conditions:     ERADICATED,
                BROKEN ITEM,
		BROKEN WEAPON,
		AFRAID,
		ASLEEP

Loot:
Containers:	4
Trap Level:	8

Walkthrough:
Efreet weak to Cold
Djinn weak to Poison
Genie weak to Fire

but more simply, Implosion and Acid Burst on all 3.  Guardians, Physical.

Clear the long corridor, watch your back, head to E and then down the ramp to reveal the vast inner space. Check to make sure you have the Back Door Key, if not you may have missed a Sentinel of VARN.  Get the key.

Head to the E wall then N all the way
Enter the 2nd gold trimmed passage
Find the Cleansing Pool
On N wall is Water Temple (locked)
Stay along S wall then S into Back Door

The backdoor hallway goes far to the E with a 5 branches that head S.

FIRST branch-to-S leads to some large pools, Genie Lamps, Doctor's Code, Engineer's Code, Communications Officer's Code, and the VARN Chest Key. Requires Bibliotheca Chest Key.

SECOND/THIRD branch-to-S circles upon itself and has nothing of note other than combat.

FOURTH branch-to-S is a wider passage, note the small alcove to N has a small pool you can use to extinguish radiation...

FIFTH branch-to-S has a lot of winding corridors, explore them all and find First Mates Code and Water Temple Key.

Go back to the Water Temple now that you have the key. Clear the upstairs for some loot and then go down below for the chest.  Collect Crystal Skull, Navigator's Code, and Bibliotheca Chest Key. Jump back and open the Bibliotheca chest.

Head back to the S end of the pyramid interior space where you first entered. Find the double picture door heading W, it is to the W of where you came in.

Push the Switch behind the door to W
Open Chest for the Captain's Code, another Crystal Skull, and the Flame Door Key.

Head to the very large red door and use the Flame Door Key. Read the notes for the codes:

First Mate's Code: kcops
Communication Officier's Code: aruhu
Engineer's Code: yttocs
Navigator's Code: ulus
Doctor's Code: yoccm
Captain's Code: krik

Enter the 5 pools and enter the corresponding code as prompted then stand on the blue water and enter the Captain's Code to reveal a ladder. (the character with the code must be selected when entering the pool)

Find the chest and use the VARN Chest Key.
Collect Control Cube.
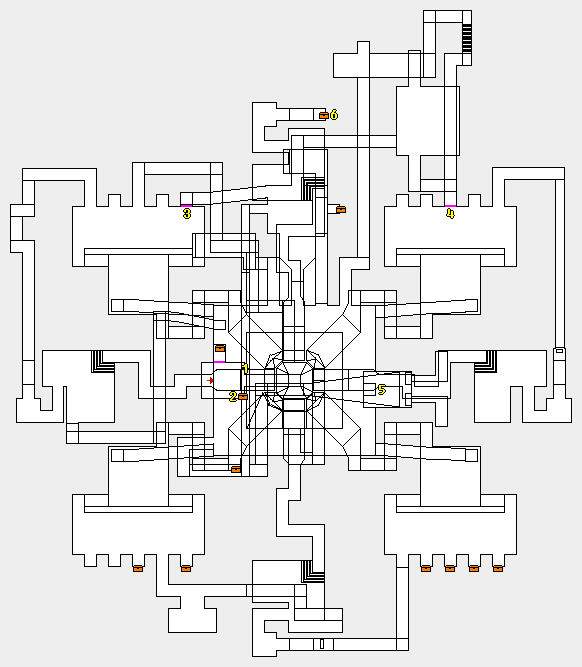
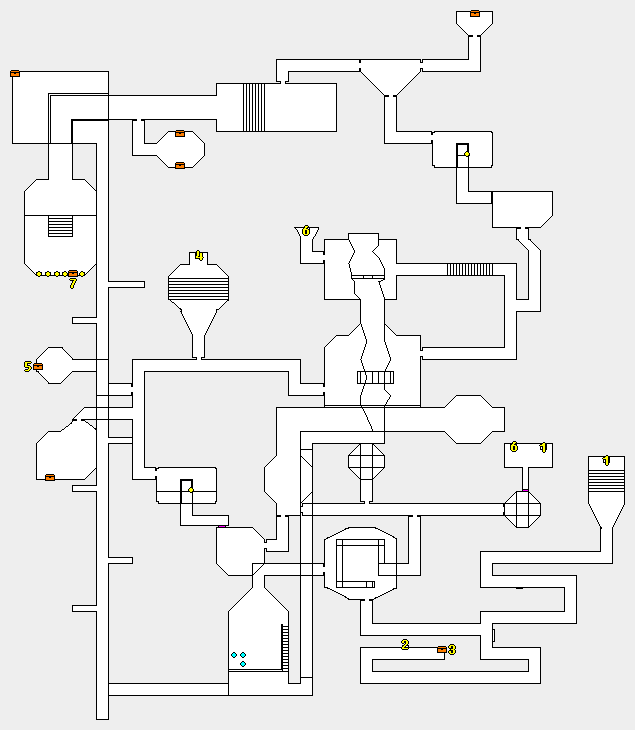
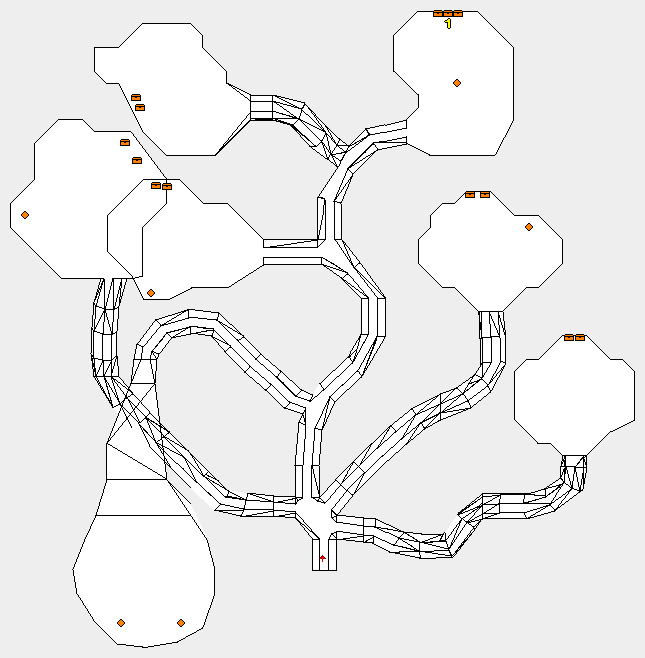
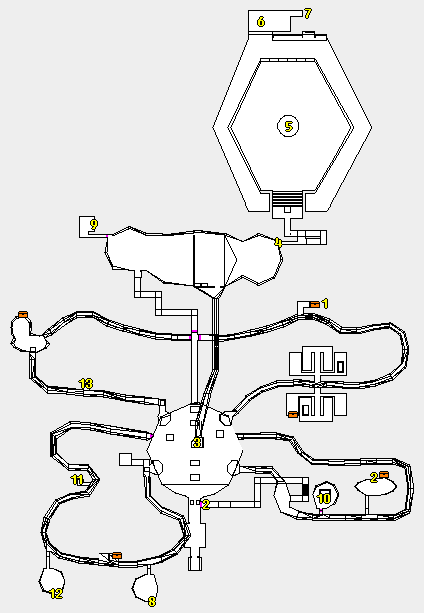
The Hive
This strange structure commands a spectacular view of Paradise Valley. The outer walls are constructed from an unknown material.

Objectives:
Save Enroth

Foe Groups:
1  Devil Spawn,
   Devil Worker,
   Devil Warrior
2  Devil Captain,
   Devil Master,
   Devil King
3  Reactor
U  Demon Queen

Rest-time Encounters:
    Chance:	100%
then which
   Group 1:	50%
   Group 2:     50%

AVG Foe Lv:	58.75
AVG Foe HP:	600.00
Conditions:     DISEASED,
                DRAINED SP

Loot:
Containers:	5
Trap Level:	10

Walkthrough:
The entrance opens to a circular room with a LOT of demons. Pull them up to the entrance door a few at a time. Blasters help incredibly but when you have them stacked up around you, you really might want your melee char (if) to use their melee weapon.

Be sure to Set a Beacon just outside the dungeon, which works better if you clear the outside area first.

Once you clear the first circular room of demons you can notice 4 holes NE,NW,SE,SW and a 5th hole in the center which is covered to start.  Each hole will path around passing a few smaller rooms with chests or switches and then ultimately circling back to the circular room with the 5 holes.

First, you need to Tap the Switch to open the central hole.. you can find it down the SE hole and then in the 3rd doorway to the N.

Next, you need the Hive Sanctum Key.. you can find it down the NE hole and then into the 2nd doorway to the N.

If you want the good ending, make sure you have the Ritual of the Void scroll in your inventory.

Finally, you can jump down the central hole and use the Hive Sanctum Key to reach a Switch. The switch press will start the encounter with Reactor. Stand back and shoot.  When the reactor dies fight starts with Demon Queen -- back yourself into the exit doorway to NE and spam attack for your life.
Attribution
Thanks to Stormcat for the MM6 Viewer. Thanks to GreyFace for so many revelations about how the game works. These folks created tools allowing access to all the data points necessary to build this page along with a few playthroughs, MM6 Viewer can be found here.
Official Manual is here.
Also thanks to https://mm6.wiki/ for the detailed maps.
How to obtain a copy of this game:
eBay link – PC version (1998)
GOG link – Digital PC version (includes games 1-6)